This article is primarily aimed at large events, but it can of course be useful to any event planner.
In order to quickly and efficiently manage the flow of attendees on the day of your event, a check-in and access control area must be set up. Several options exist – here is an overview of a typical space, to be adjusted to your venue and event.
This article is primarily aimed at large events, but it can of course be useful to any event planner.
In order to quickly and efficiently manage the flow of attendees on the day of your event, a check-in and access control area must be set up. Several options exist – here is an overview of a typical space, to be adjusted to suit your venue and event.
1. Checking tickets
If the number of people on your staff allows it, it is advisable to carry out a visual check of the tickets before even allowing participants to enter the access control area. This will prevent people without tickets slowing things down.
In the event that a person shows up without a ticket, you can send them back to the sales or reception area.
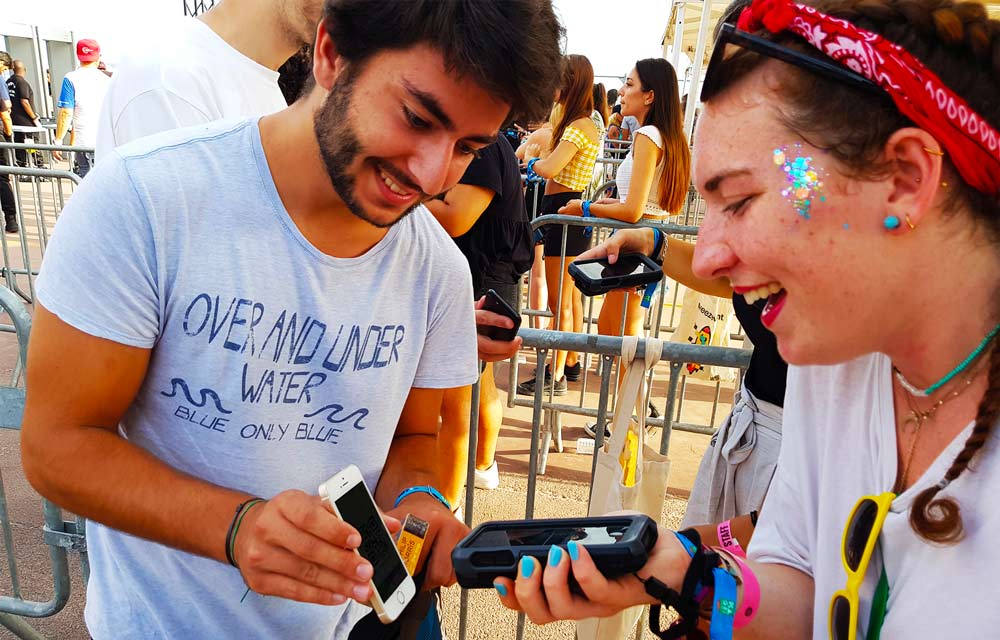
The sales area
You can set one up provided your tickets aren’t sold-out. Even when the event is sold out, some event planners choose to allocate a small quota of tickets to on-site sales. On the one hand, this limits the level of dissatisfaction of last-minute buyers; on the other hand, it discourages the resale of tickets on the black market around the event. To do this, you will need power, internet access and a connected computer or tablet.
The reception
It will help you solve any issue directly or indirectly related to the ticketing system. For example, you can give your attendees the option to pick up a duplicate of their ticket (for tickets purchased on Weezevent) or a pass (for tickets purchased on a reseller’s network) upon presentation of valid ID. To do this, simply set up two workstations (computer or tablet) connected via the Internet to Weezevent’s back office and a desktop printer.
In case of internet failure, 4G dongles can be rented from Weezevent as back-up.
2. Queues
The foundation of any good access control system is comprehensive and well-located information in order to avoid any misunderstanding amongst attendees. We recommend that you put signage up at the start of the lanes. E.g.: ” Get your tickets ready”, so that attendees present their tickets with the barcode in plain view.
If necessary, such as when using wristbands, this type of information will allow you to efficiently divide your waiting area into several separate queues. E.g.: “Day Pass”, “Weekend Pass”, …
Staff at the entrance of the queues can use the ticket verification stage to direct attendees to the right queue.
It is possible to check all your tickets (e-tickets and printed tickets, issued by either Weezevent or resellers) using WeezAccess Pro devices. This system offers several benefits – quick training and easy-to-use by your ticket scanning team, comprehensive statistics available at any time on your Weezevent interface.
You can find more information about Weezevent’s access control system here: WeezAccess. This access control system is also available free of charge on iPhone through our WeezAccess mobile app, which can be downloaded for free from the Apple Store.
If it is necessary, separate queues using a system of barriers by installing them in a Z-shape. This will benefit you in several ways: first of all, the waiting time seems shorter for people attending your event. We recommend implementing a signage system dedicated to informing participants about the schedules, programming and access of your event. More importantly, Z-shaped barriers allow a more regular flow of people than straight barriers, thereby preventing crowd surges and maintaining a good level of safety.
3. Search – Security
Each event has its own security requirements. In order to help the security team present on site you should carry out a preliminary search of the attendees. The staff in charge of the search/security must include at least one man and one woman. The search/security area should be located directly after the Z-shaped barrier and before the ticket control area. This allows you to set up a filter to easily manage the number of attendees gaining access to the next step. We also recommend that you provide bins in this area to allow attendees to discard any objects not allowed in the venue.
Anyone not meeting the security criteria can be brought back to the entrance by means of a closed line on the side, secured by the presence of other security guards.
4. Lockers
If you allow attendees to collect certain items prohibited on site at the end of this event, the search/security area is the ideal place to set up lockers to be used by attendees wishing to leave some of their items at the entrance. It is up to you to set up guidelines on the use of these lockers.
A search/security officer can be placed in this area to create a link between the search area and the control area, while inviting attendees to head towards the entrance.
5. Ticket control area
We recommend you put up clear signage in the ticket control area. E.g.: “Have your tickets ready”.
Indeed, in most cases, time lost at access control is due to the time it takes to get out and unfold tickets. This is why it is preferable that your attendees have their tickets in their hands throughout the control process, with barcodes in full view.
We recommend you place volunteers checking tickets at the entrance of short queues separated by a system of straight barriers. This set-up allows attendees to quickly and easily see which volunteers are available to check their tickets. If a technical problem arises in one of the rows, participants can move to another control row.
In order to avoid any fraud when checking tickets, we advise your scanning team to position themselves with their backs against one of the two barriers surrounding them. Thus, no attendee will be able to access the event without being duly controlled. Thanks to this system, you can have two control stations per line – one on either side of the line.
If turnout is high, you can also choose to move your ticket scanning staff further back into the barrier. However, it is the responsibility of your security team – not your scanning staff – to regulate the flow of people.
6. End of control area
In order to avoid any unnecessary crowding of attendees, which could affect the proper functioning of the access control area, we recommend placing several security officers at the end of the area. Their mission will be to invite attendees to leave the control area quickly and proceed to enter the event.
Managing the flow of people at access control depends on how you pace the programme of your event. If you announce a much-anticipated act during your event, you will see a peak in access control attendance half an hour to an hour before said act. In order to avoid any inconvenience, we advise you to open the doors early enough (allow half an hour to an hour before the start of your event).
All these tips depend of course on the organisation of your event and can be adjusted to suit everyone’s needs. They cannot replace the expertise of a security committee.
Do not hesitate to contact us at contact@weezevent.com so that one of our advisors can help you!
We wish you a good event, with fast and secure access control. With Weezevent, you can do more than just controlling access. Discover all our other services by clicking on the button below: